Vitamins and Minerals for Dogs
Biotin: Aids in enzymatic processes
Choline: Helps maintain the nervous system
Folic acid: Works with vitamin B12 and helps form red blood cells.
Vitamin A: Helps maintain vision, bone growth, tissue and reproductive processes
Vitamin B1 (thiamine): Aids in normal growth, appetite and energy production
Vitamin B2 (riboflavin): Aids in growth
Vitamin B5 (pantothenic acid): Helps produce energy and metabolize protein
Vitamin B6 (pyridoxine): Helps metabolize protein and form red blood cells
Vitamin B12: Helps synthesize DNA and aids intestinal function
Vitamin C: Helps form tissue, heal skin and maintain bones and teeth; may help support healthy joint function as well as immune function
Vitamin D: Helps use calcium and phosphorous to maintain bone and cartilage
Vitamin E: Important for muscle function and normal reproduction; protects muscle cells from damage due to oxidation in the body
Vitamin K: Facilitates proper blood clotting
Dogs also require some of the same minerals humans require. The following are the most important of these minerals:
Calcium
Magnesium
Phosphorous
Sulfur
Calcium and phosphorous work together to strengthen bone. Magnesium helps with cell action and nutrient metabolism. Sulfur helps the body synthesize protein and protects joints.
Dogs don’t just need these minerals, but in the correct amounts. For example, insufficient calcium can result in muscle, nerve, bone and blood problems, but excessive calcium can cause bones to grow too quickly and lead to future orthopedic disorders such as hip dysplasia.
Dogs also need trace minerals, such as:
Iron
Zinc
Copper
Cobalt
Selenium
Manganese
Iodine
Cobalt
Mineral requirements differ slightly for different dog breeds. Check with your veterinarian to be sure the food you have chosen has the correct nutritional profile for your individual dog.
Parsley Fresh-Breath Treats For Your Dog
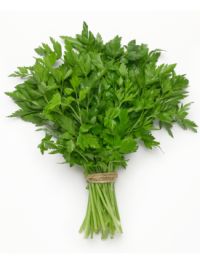
Try these pup-pleasing, parsley dog treats!
Ingredients:
1¾ cup lukewarm meat or vegetable broth
1½ teaspoon dry yeast
1¾ cup all-purpose flour
1 cup whole wheat pastry flour
½ cup yellow cornmeal
¼ cup fat-free powdered milk
1 tablespoon fresh chopped parsley
Directions:
Preheat oven to 300 degrees
Dissolve yeast in lukewarm broth and let stand until foamy (about 10 minutes)
Stir in dry ingredients and fresh herbs
Roll the dough out to ¼-inch thickness
Cut shapes with your favorite cookie cutters, and bake on a greased cookie sheet for 45 minutes
Turn off oven, and allow biscuits to finish hardening 10 to 12 hours. Recipe makes 20 to 30 biscuits, depending on the size and shape.
Parsely and many other herbs can easily be grown in your home and can provide endless options for enriching your life and your dog’s.
Pup-tato Skins Recipe
Want to make any easy dog-treat that you and your dog can both enjoy? Try our easy recipe for Pup-tato Skins using only a couple of ingredients. Whether you are “tail”-gating, making Irish Nachos for St. Patrick’s Day or just looking for an easy treat to try, these dog-friendly spuds are sure to be a crowd-pleaser. As with any treat, feed in moderation, especially if it’s your first time feeding a particular snack.

Fingerling or small yellow or red potatoes
You can also use full size russet potatoes, but you will need to cut them into smaller pieces.
Make sure they are an appropriate size for your dog so that they do not pose as a choking hazard.
Olive oil to lightly coat potatoes
Shredded cheese (1 tsp per potato)
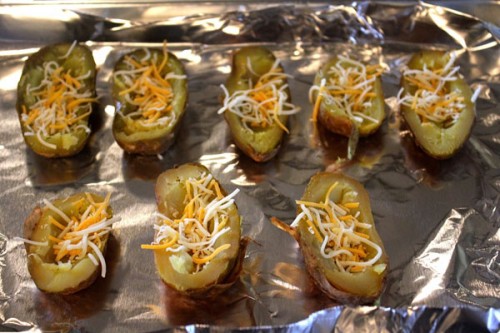
Lightly coat potatoes with olive oil
Place potatoes on a lined sheet pan
Bake at 450 until fork-tender; about 45 min depending on the size of your potatoes
When potatoes are cool, cut in half lengthwise
Scoop out some of the potato to create a small well in your potato
Place potatoes back onto the baking sheet and sprinkle cheese into the well you have created
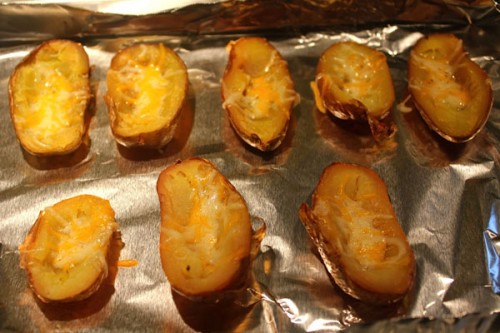
Bake again at 450 for 7-8 minutes or until cheese has melted
Puppermint Dog Treats
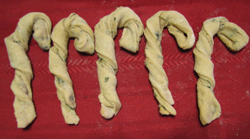
An added bonus, the peppermint and parsley help with bad breath, which will thrill your guests.
Ingredients:
1 cup flour
½ tsp salt
1 tablespoon parsley
1 ½ tablespoons flaxseed oil
¼ teaspoon peppermint oil
½ cup low-sodium chicken broth
Parchment paper
Directions:
Mix flour, salt, and parsley together in mixer.
Add flaxseed and peppermint oil, mix.
Add chicken broth; mix until all dry ingredients are moistened
Roll dough out on floured surface to a 1/8” thick sheet.
Cut into ¼ – ½” inch strips.
Fold strips in have and twist together, curving one end over to make a candy cane shape.
Place on cookie sheet lined with parchment paper
Bake at 375 for 15-20 minutes
Makes approximately 10 candy canes
Allow to cool thoroughly before giving to your dog!
Pumpkin Paw Prints Recipe
The recipe comes from Roberta Deen of Capers Catering Company in Los Angeles. She is one of the chefs who contributed to the book The Culinary Canine: Great Chefs Cook for Their Dogs- And So Can You!
Easy to make our dogs gobbled them up. They would also make great dog lover gifts to take to your friends this holiday season or any time of year. Package them up in cellophane or a nice tin and you’ll have your friends barking for the recipe.
Ingredients:
1 cup plain pumpkin puree (fresh or canned)
1 cup peeled, 1/4” diced, lightly blanched fresh pumpkin
1/2 cup roasted pumpkin seeds, coarsely chopped
1 cup quick-cooking oats
2 cups whole-wheat flour
1 cup all-purpose flour
1/2 teaspoon cinnamon
1/2 cup molasses
1/2 cup honey
1/2 cup unsweetened applesauce
1/2 cup canola oil
Directions:
Preheat oven to 325 (300 if using a convection oven)*
Mix above ingredients in a large bowl
Add water to achieve a chocolate-chip cookie like consistency
Line baking sheets with parchment paper
Drop by teaspoons (for the petite puppies) and Tablespoons (for the big guys) onto baking sheets about 2 inches apart
Flatten into rounds with a fork in a cross-hatch pattern
Bake for 10 minutes
Switch the baking sheets front to back, top to bottom and bake for 5-10 minutes longer until golden and firm – adjusting time for teaspoons (a bit less) and for tablespoons (a bit longer)
Turn off oven and leave the door open until the treats cool completely
Yield depends upon size of the cookie
Treats should be fed in moderation. Consult your veterinarian any time you are making changes to your dogs food or diet.
Football Dog Treats: Touchdown Tasties
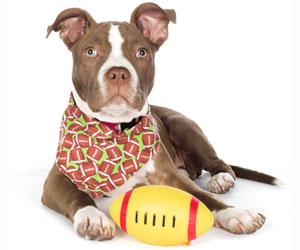
Check out these pawsome football-shaped dog treats Lucy Postins, CEO of The Honest Kitchen, created in honor of game day.
Ingredients
1 cup dehydrated dog food
¼ cup ham, diced
3 tbsp grated American or Cheddar cheese
½ *Avocado, mashed
1 free range egg, lightly beaten
3/4 cup warm filtered water
Directions
Preheat the oven to 350°F. Hydrate the dog food with the warm water and stir. Thoroughly mix in the remaining ingredients to form a batter.
Use your hands to form the mixture into “football” shapes, and place onto a greased or non-stick baking sheet.
Bake in a 350°F oven for 20 minutes.
Cool completely before serving.
Treats can be stored in an airtight container in the fridge.
*Although avocado stones are poisonous to dogs (and the stone as well as the tough skin could potentially be a choking hazard), the flesh itself is fine for occasional feeding in small quantities, and is a great source of natural, healthy oils. Take care to keep avocado skin and stones out of your pet’s reach and dispose of them (as well as other hazardous food scraps like onion and cooked meat bones) in a secure trash can that they can’t easily raid while you’re enjoying the game. Learn about other fruits and vegetables you can feed your dog: Fruits for Dogs, Vegetables for Dogs.
Make Your Own Chicken Jerky Dog Treats
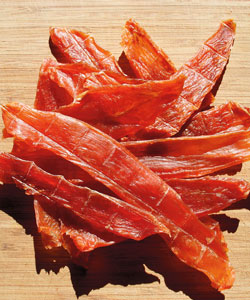
If you choose to feed your pet jerky treats, one option is to dry your own treats using a food dehydrator or your oven. This allows you to buy local, high-quality meats, giving you peace of mind about the safety of the ingredients.
Jerky Basics
Dehydration preserves foods by removing moisture, which inhibits the growth of microorganisms. You can dehydrate most raw meats, such as slices of beef, chicken, turkey, fish, or liver, as well as many fruits and vegetables, such as sliced apples, sweet potatoes, and carrots.
Several brands of small dehydrators are reasonably priced and easy to use. These machines have stacked or slide-out trays that hold the food to be dehydrated. A motor provides heat and powers a fan that blows hot air over the food. A tray at the bottom catches excess moisture.
You can also dry foods in your oven — on a cookie sheet — if it can be set at a low enough temperature. The lowest temperature for many ovens is 150 degrees Fahrenheit, and that’s fine. Prop the oven door open a few inches with a towel so hot air laden with moisture can escape. This works well, but because your oven is also heating the air in the kitchen, it uses more energy than a food dehydrator would.
Store dehydrated foods in airtight containers in the refrigerator or freezer. Protect these foods from moisture and humidity, or they will spoil.
The American Veterinary Medical Association advises pet owners who feed jerky treats to do so in small quantities and only on occasion, especially with small-breed dogs.
Chicken Jerky Strips
The thinner you slice the meat, the less time it takes to dry. Popping the meat into the freezer for about 15 minutes beforehand makes it easier to slice thinly.
Ingredients
1 1/2 pounds boneless skinless chicken breast tenders, sliced into strips about 1/8 to 1/4 inch thick
1/2 cup vegetable oil
Directions
Rinse off chicken breast and remove any fat. Fat slows down the dehydrating process and makes your jerky spoil faster. Slice the chicken with the grain. This will help make the jerky even chewier.
Lightly coat the chicken slices with vegetable oil to prevent sticking.
Place the chicken breast strips evenly on the tray, leaving space between them and making sure they do not touch each other.
Once they are all in the dehydrator, turn it on and set the temperature to 140 degrees Fahrenheit.
The jerky will probably take between three and 12 hours to fully dry, depending on how thick you cut your slices. Start checking it once every hour after the first hour. To check it, open up the tray and take one slice out. Cut it open with a sharp knife and examine the inside. You should see no moisture at all, and it should be the same color throughout. If it’s not finished, put it back in for another hour. Once it gets close, check every half hour.
Once your jerky is done, store it in airtight containers. Write the date you made it on them. Out of the refrigerator, the treats last about 10 days in an airtight container. They’ll keep in the refrigerator for approximately three weeks. They can also be frozen for up to eight months.


